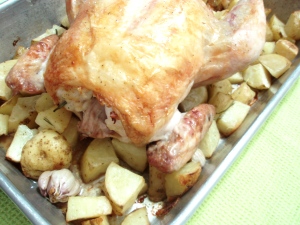
Roasted Chicken with Kennebec Potatoes
This is the easiest meal! Even a novice cook can make a great roast chicken. The best part is that it always impresses people! Not to mention the great uses you can use the leftover meat for ( You could always roast 2 just for the leftover meat) . I always save the bones (I put them in a bag in the freezer) for chicken stock. (Yes, I will pretty much freeze anything. It is a standing joke among my friends.)
You can just roast the chicken, or you can roast potatoes and/or vegetables under the chicken for a complete meal. If you want to make gravy, you need to roast the chicken by itself. Roasting vegetables soak up all the juices you need to make gravy, but in turn it makes them taste fantastic! This recipe uses a French technique for keeping the breast meat moist. Because the dark meat takes longer to cook, there is always a danger of overcooking the white meat in the breast. The French start cooking the bird upside down, so all the juices flow into the breast and the dark meat is more exposed to the oven’s heat. Halfway through cooking, the chicken is turned right side up to brown the skin and make it crispy. A really fail-proof method for a juicy chicken. (It is also great for roasting turkeys – it will just be more awkward to wrestle around. For turkeys I usually roast on one side, then the other, then roast breast side up. You can use balls of aluminum foil to prop the turkey in place) Once you make this, you won’t want to buy one of those saline injected rotisserie chickens at the store!
Perfect Roasted Chicken
- 1 Whole Chicken, about 4lbs
- 1-2 Tablespoons Butter or Olive Oil
- Salt & pepper or a spice rub of your choosing, to taste
- Optional: Fresh herbs (especially thyme, sage, rosemary, parsley or bay leaves – any combination you like) , garlic cloves, a halved lemon, whatever strikes your fancy!
Preheat oven to 400F. Have ready a shallow sided roasting pan (at least 8’x10″). Remove chicken from wrapping and make sure to remove any packets of giblets that may be in the cavity. Check the cavity for any remaining organs – sometimes the liver or lungs are still left in- and remove. It won’t wreck the chicken completely, if you are reluctant to pull them out, unless you are planning on saving the bones for stock. Liver makes the stock really funky tasting. There is no need to rinse the chicken off. Doing so usually just spreads bacteria around your kitchen. (On that note – make sure you wash your hands after touching the raw meat. Salmonella -amongst other bacteria- is pretty unavoidable in US chickens thanks to widespread overuse of antibiotics and crowded breeding/growing conditions. This applies even to free range and organic chicken as it can be passed through breeding stock/soil/water) Best practice is to portion out what you want to rub on or stuff in chicken before you touch the meat. Then all you touch with your germy hands will be what is going on the meat anyway! If you want to be very basic, just sprinkle the cavity and the skin of the chicken with salt and pepper to taste and then rub on the olive oil or butter. If you are feeling creative, fill the cavity with a halved lemon, sprigs of herbs, garlic cloves, etc. You can also rub on spice rubs instead of salt and pepper. If you want to be really fancy, you can loosen the skin over the breast meat with your hand (slide your hand under it very gently, starting at the neck) and place whole herb leaves, butter, etc right on top of the meat. Get creative – there is no right or wrong!
If you have a roasting rack, place it in the roasting pan, but it is not necessary. ( I generally don’t use one, but it does help airflow around the chicken and crisp the skin more.) Place the chicken breast side down. You can truss the bird for a neater presentation, but I just usually tuck the wings back and let the legs settle wherever they want ( the chicken will cook slightly faster untrussed, as well). Place pan in preheated oven and roast for 35 minutes. After 35 minutes, remove the pan from the oven. Using paper towels as disposable hot pads, grip the chicken and turn it over so it is breast side up in the pan. You could also use a pair of tongs instead, just be careful not to tear the skin. Roast for another 20-25 minutes, adding an additional 3 minutes for every pound (and fraction of) above 4 pounds, until the skin is nicely browned and the meat is fully cooked. To check for doneness: 1. Use an instant read or meat thermometer and poke it in the thickest part of the thigh without touching bone. It needs to be at 170F or above. 2. Prick the thickest part of the thigh – juices should run clear (signifying all blood has been cooked and solidified) and the leg should move freely, meat almost falling from the bone. Using a thermometer is the most reliable and safest method. Once fully cooked, remove chicken to a platter and cover loosely with foil to let the meat rest and juices flow back into the meat. Let rest about 10 minutes. Serves 4-6.
To make gravy: Pour off all but about 2 Tablespoons of the fat/juices from the bottom of the pan and discard. Toss 2 Tablespoons of flour in the pan, along with a little salt and pepper. Stir this around until the flour absorbs the fat. Heat this pan over medium heat and cook for a few minutes, until the mixture is bubbly and golden. You are trying to cook off the floury taste. Pour in a little wine, hard cider, lager beer or chicken stock to deglaze the pan – enough to make the mixture liquidy enough to stir and to dissolve the brown bits at the bottom of the pan (these hold a lot of concentrated flavor), about 1/2 cup to start. Once the liquid has mostly evaporated, add in a cup or so of chicken stock and stir pretty constantly as you bring the mixture to a boil. Boil about a minute, then taste and check for seasoning, adding salt and pepper as needed. If the mixture is too thick, thin it out with a little stock or water and bring back to a boil. It is better to have it too thick than too thin, as you can always add a little stock or water. Strain the gravy into a serving vessel and serve alongside the meat.
To roast vegetables with the chicken: You can roast just potatoes, or a mixture of root vegetables with the chicken. Potatoes can be peeled, if desired. Carrots, Celeriac/Celery Root, Turnips, Rutabagas, Kohlrabi, Parsnips, Salsify, Sweet potatoes and onions can all be used, but they need to be peeled. Chop desired vegetables into 1″ chunks. Place in the bottom of roasting pan before the chicken. Toss with a little drizzle of olive oil or melted butter and season with salt, pepper, and herbs as desired. The vegetables will absorb the juices and some fat from the chicken, so only a tiny bit of oil is needed to get the veggies started – just barely enough to coat! You can roast heads of garlic in the pan too – just slice a little off the top and drizzle with a bit of olive oil. Place the chicken, breast side down, on the vegetables, or place the vegetables around the roasting rack, if you are using one. When you flip the chicken, give the veggies a stir. If they are not quite done when the chicken is, place back in the oven while the chicken rests. Voila! Complete meal in one pan! You can use a little wine or chicken stock to deglaze the pan after the veggies are removed, scraping up any browned bits. Bring to a boil and check for seasoning. Serve pan jus over the chicken like you would gravy – it will have a much thinner consistency and be almost absorbed by the meat.
Easy Peasy and Tasty!
Read Full Post »


